Granny Square Pattern: Crafting a Stylish Crochet Bag
Granny Square Pattern: Crafting a Stylish Crochet Bag

Granny square patterns have captivated crocheters for generations, offering a perfect blend of nostalgia and modern style. These versatile squares are not just for blankets anymore; they've found their way into fashion accessories, including stylish tote bags. Crafting a granny square bag allows crochet enthusiasts to showcase their skills while creating a functional and eye-catching accessory.
This article guides readers through the process of making a chic granny square bag. It covers the basics of granny squares, helps with yarn and color selection, and provides a step-by-step tutorial. Readers will learn to design their bag layout, assemble the squares, and shape the final product. By the end, crocheters will have the knowledge to create a unique and fashionable accessory using this timeless crochet pattern.
Understanding Granny Square Basics
History of Granny Squares
Granny squares have a rich history in the world of crochet. The earliest known example of a traditional granny square was published in 1885 in the Prairie Farmer magazine, designed by a Mrs. Phelps . This early pattern introduced the concept of creating strips of squares that could be joined together to form larger projects.
The granny square motif experienced a resurgence in the 1930s, appearing in various publications such as Fleisher's Afghans . Over time, it has evolved into a versatile and beloved crochet technique. In fact, granny squares became so popular that they were used for a wide range of items, including garments, bags, and blankets. Interestingly, their popularity was so widespread that in Europe, granny squares were often referred to as "American Crochet" .
The name "granny square" has an interesting origin. It's believed to have been coined because grandmothers were typically the ones making these squares. Additionally, the simplicity of the design meant that even those with poor eyesight could create them easily .
Essential Stitches
The basic granny square pattern is renowned for its simplicity and ease of learning, making it an ideal project for beginners . At its core, a granny square is composed of a few essential stitches and techniques:
Chain Stitch: This forms the foundation of the square and is used to create spaces between clusters.
Double Crochet (DC): The primary stitch used in granny squares. It's typically worked in groups of three, forming what's known as a "granny cluster" .
Slip Stitch: Used to join rounds and finish off the square.
Magic Ring: Many granny squares start with a magic ring, which creates a tight center for the first round .
The construction of a basic granny square follows a specific pattern:
Begin with a small loop of chain stitches or a magic ring .
Work the first round by creating 12 double crochet stitches in the center ring .
Subsequent rounds alternate between sets of double crochet clusters and chain stitches .
Corners are formed by working two clusters separated by chain stitches in the same space .
Each new round is typically joined with a slip stitch at the end .
It's worth noting that while the traditional granny square uses double crochet stitches, there are countless variations that incorporate different stitch types and even produce other geometric shapes like hexagons .
One key feature of granny squares is their flexibility in color use. Crafters can create solid-colored squares or change colors with each round, allowing for endless creative possibilities . This versatility, combined with the square's simple construction, has contributed to its enduring popularity in the crochet community.
Understanding these basics provides a solid foundation for creating granny squares and opens up a world of possibilities for crafting unique and stylish crochet projects, such as the tote bag this guide focuses on.
Choosing Your Yarn and Colors
When crafting a granny square bag, selecting the right yarn and colors is crucial for both functionality and esthetics. This process involves understanding different fiber types and applying color theory to create a visually appealing and durable accessory.
Fiber Types
The choice of yarn significantly impacts the bag's durability, appearance, and functionality. Here are some recommended fiber types for crochet bags:
Cotton: Cotton yarn is a popular choice for crochet bags due to its strength and minimal stretchiness. Unmercerized cotton, like Lily's Sugar'n Cream yarns, offers more friction, making it ideal for heavy-duty tote bags or boxy designs that need to hold their shape .
Cotton Blends: Yarns that combine cotton with other fibers can offer the best of both worlds. For instance, Scheepjes Softfun, a blend of 60% cotton and 40% acrylic, provides softness and durability, making it perfect for bags that double as comfortable pillows .
Linen Blends: Patons Linen, composed of 65% cotton and 35% linen, is an excellent choice for bags with a boho esthetic. This blend offers the durability of linen with the softness of cotton .
Ribbon Yarn: For quick projects, consider a bulky option like Premier's Ribbon yarn, a blend of 65% cotton and 35% polyester. It's hard-wearing, washable, and works up quickly due to its thickness .
Wool (for Felting): If you're planning to felt your bag, 100% wool yarn like Malabrigo worsted is ideal. The felting process can create a sturdy, water-resistant fabric perfect for bags .
When selecting yarn, consider factors such as:
Stretchiness: Less elastic fibers like cotton and linen are preferable to prevent sagging .
Weight: Medium to bulky weights are typically best for bags, though lighter weights can work for string market bags .
Pilling Resistance: Smooth fibers and tightly twisted yarns with multiple plies resist pilling better than fuzzy, loosely twisted, single-ply yarns .
Colorfastness: Opt for yarns that won't bleed or transfer dye, especially for bags that might get wet .
Color Theory for Bags
Choosing colors for your granny square bag is an opportunity to express creativity and personal style. Here are some tips for selecting a harmonious color palette:
Odd Numbers: Colors often work best in odd numbers, with five being an ideal choice. This could be five different colors or five shades of the same color .
Balance: Aim for a pleasing balance in your color choices. Consider how the colors interact and create a visually appealing combination .
Complementary Colors: Experiment with complementary color schemes. For example, pair blues with oranges, which are opposite on the color wheel. Try different combinations by swapping colors in and out until you achieve a mix you like .
Color Harmony: Another approach is to use a harmony mix. Choose a main color group and add a color that sits next to it on the color wheel, along with a neutral. For instance, combine purples (wisteria, violet) with pink (fiesta) and gray .
Online Tools: Utilize online resources like Design Seeds to explore color combinations. These tools can help you find inspiration and match colors to your preferred yarn brands .
Personal Preference: Remember, there are no strict rules. Choose colors that appeal to you and suit your personal taste or home decor .
To help visualize your color choices, consider using a color planning app. These digital tools allow you to arrange real yarn images into palettes, making it easier to see how colors will work together before purchasing . Some apps even suggest yarn colors based on uploaded images, which can be a great starting point for your design .
By carefully considering both the fiber type and color scheme, you can create a granny square bag that is not only functional and durable but also a beautiful expression of your personal style.
Step-by-Step Granny Square Tutorial
Round-by-Round Instructions
Crafting a granny square involves a series of simple steps that, when combined, create a beautiful and versatile square motif. Here's a detailed guide to help crocheters of all levels create their own granny squares:
Start with a Slip Knot: Begin by making a slip knot on the crochet hook. This serves as the first loop of the granny square.
Create the Foundation Chain: Chain 4 or 5 stitches to form the center ring of the square. This will serve as the foundation for the first round.
First Round: Work the first round in the center ring. A classic granny square typically consists of three double crochet (dc) stitches grouped together, separated by chain stitches. This creates the first cluster .
Subsequent Rounds: Build the granny square by working additional rounds around the center cluster. Each round consists of corner clusters and side clusters:
Corner clusters: Groups of three dc stitches separated by chain stitches, creating the corners of the square.
Side clusters: Similar to corner clusters but without the chain stitches between them .
Increasing the Size: Add more rounds, each with corner and side clusters, to increase the size of the granny square. Repeat this pattern until the desired size is achieved .
Finishing: Once the granny square has reached the desired size, finish it off by working a slip stitch in the top of the starting chain of the first round. This creates a smooth and neat edge .
Fasten Off: After the slip stitch, cut the yarn, leaving a tail, and pull it through the loop on the hook to secure it. Weave in the ends to tidy up the work .
Tips for Consistent Squares
Achieving consistent tension in crochet stitches is crucial for uniform granny squares. Uneven tension can result in squares that are too tight or too loose, leading to irregular shapes and sizes. Here are some tips to help control tension and create consistent squares:
Practice with various yarn and hook sizes to find a comfortable combination .
Maintain a relaxed grip on both the yarn and hook, avoiding excessive tightness .
Pay attention to hand position and the motion of stitches to maintain consistency .
Take breaks when hands become tired, as fatigue can lead to uneven stitches .
Use a hook that's one size smaller than normally used. This can result in more compact stitches, creating a neater appearance and increased stability that minimizes the notorious "granny lean" .
Consider flipping the square every round to counteract the lean that occurs in the direction of the round .
Experiment with starting each round in a different corner to disrupt the lean's flow .
Try omitting the chain stitch between clusters of double crochets on the four sides to reduce gaps and achieve a more polished appearance .
For a modified approach, start with a chain of 5 instead of 3 at the beginning of each round. This allows three chains to serve as the final stitch of the round, while the remaining two form the corner .
By implementing these tips and techniques, crocheters can create neat, consistent granny squares that form the perfect foundation for a variety of projects, from blankets to stylish bags.
Designing Your Bag Layout
Size Considerations
When designing a granny square bag, size plays a crucial role in both functionality and esthetics. The beauty of granny square patterns lies in their versatility, allowing crafters to customize the bag's dimensions to suit their needs. The finished size of a typical granny square bag is approximately 15.5 inches tall, 15 inches wide, and 3 inches deep, with handles adding about 10 inches to the overall height .
The size of the bag is largely determined by the yarn weight and hook size used. For a larger beach bag-style tote, crafters can opt for worsted weight or bulky weight yarn with a corresponding hook size. Conversely, to create a smaller bag, a #2 lace weight yarn with its matching hook can be used . This flexibility allows for complete customization of the bag's dimensions.
For those seeking an optimal size for a versatile tote bag, a #3 DK light weight yarn is recommended . This weight strikes a balance between durability and manageability, resulting in a bag that's neither too large nor too small for everyday use.
It's important to note that precise sizing can be somewhat flexible when it comes to granny square bags. As long as the two main granny squares used for the bag's panels are the same size, minor variations in overall dimensions won't significantly impact the bag's functionality or appearance .
Pattern Variations
Granny square bags offer endless possibilities for creativity and personalization through various pattern variations. These bags have been fashionable since the 1970s and continue to be popular today, thanks to their versatility and ease of customization .
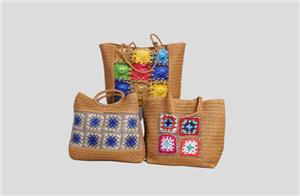
One popular variation is the two-panel granny square bag, which is an excellent starting point for beginners. This design typically requires four granny squares for the front panel and one large square for the back . This layout is less overwhelming for novice crocheters and allows them to practice joining squares as they work.
For those looking to create a more intricate design, bags with multiple smaller granny squares offer a great opportunity to play with color and pattern. Some designs require up to 24 basic granny squares, which are then seamed together to create a sturdy and practical tote bag .
Pattern variations also extend to the shape and style of the bag. Options range from small clutches and evening bags to larger totes, allowing crafters to create a bag suitable for any occasion . Some popular styles include:
Market tote bags: Perfect for shopping trips or beach outings
Clutch bags: Ideal for evenings out or as a small accessory
Shoulder bags: Great for everyday use with adjustable straps
When selecting a pattern variation, it's crucial to consider the crocheter's skill level. While some designs are beginner-friendly, others may require more advanced techniques such as color changing, joining squares, and attaching handles or linings .
By exploring different pattern variations, crocheters can create unique and personalized granny square bags that reflect their individual style and cater to their specific needs.
Assembling and Shaping the Bag
Joining Methods
Assembling a granny square bag involves joining individual squares to create a cohesive structure. The method of joining is crucial as it affects both the appearance and durability of the final product. One popular technique is the invisible seam method, which creates a seamless look on the right side of the bag .
To begin the joining process, crafters need to decide whether they want the seam to be visible on the right side or the wrong side of the bag. Typically, the seam is kept on the wrong side for a neater appearance . The joining process starts by holding two crochet squares with their right sides together or laying them side-by-side with right sides facing down .
The actual joining is done using a tapestry needle threaded with a couple of feet of yarn. The process involves inserting the needle through the outer loops of corresponding stitches on both squares, alternating between them . This creates a zig-zag pattern that securely joins the squares while maintaining flexibility.
For a more structured approach to assembling the bag, crafters can follow a specific joining order. One method involves starting with the top squares and working downwards in a zig-zag pattern . This approach ensures that all squares are properly aligned and connected.
Creating Structure
Once the squares are joined, the next step is to shape the bag. This involves folding the assembled pieces along predetermined lines and seaming the sides together . The result is a three-dimensional structure that forms the body of the tote bag.
To create a standard-sized tote, crafters typically aim for a finished size of approximately 15.5 inches tall, 15 inches wide, and 3 inches deep . However, the beauty of granny square bags lies in their versatility, allowing for customization based on personal preferences and intended use.
The structure of the bag can be further enhanced by adding handles, which typically add about 10 inches to the overall height of the bag . These handles can be crocheted separately and then attached to the main body of the bag, or they can be integrated into the design during the assembly process.
For those looking to create a more complex design, it's possible to incorporate multiple smaller granny squares into the bag structure. Some designs use up to 24 basic granny squares, which are then seamed together to create a sturdy and practical tote bag .
By carefully considering the joining methods and structural elements, crafters can create a granny square bag that is not only esthetically pleasing but also functional and durable. The assembly process allows for creativity in design while maintaining the classic charm of the granny square pattern.
Conclusion
Granny square bags offer a delightful blend of nostalgia and modern style, allowing crocheters to showcase their skills while creating a functional accessory. From choosing the right yarn and colors to assembling the final product, crafting these bags has an impact on both creativity and practicality. The versatility of granny squares opens up a world of possibilities to customize designs, sizes, and patterns, catering to individual tastes and needs.
The journey of creating a granny square bag is not just about the end product, but also about the process of learning and refining crochet techniques. It provides an opportunity to explore color theory, experiment with different joining methods, and develop skills in shaping and structuring crochet projects. For those looking to take their craft to the next level or to create a truly unique accessory, feel free to contact us to custom your granny square bags. In the end, whether you're a seasoned crocheter or a beginner, crafting a granny square bag is a rewarding experience that combines tradition with personal expression.
FAQs
1. How many granny squares are required to crochet a tote bag?
The quantity of granny squares needed for a tote bag varies based on the size of the bag and the squares themselves. For a standard tote measuring around 12 inches by 12 inches, you will typically need between 10 to 15 squares.
2. What is the most suitable crochet stitch for making a bag?
The Double Crochet Rib Stitch is highly recommended for bags, especially larger ones like beach bags. This stitch is straightforward, mimicking the rib stitch found in knitting, and provides a robust texture. For example, a 9 mm (US M/N13) beechwood crochet hook was used for the sample swatch.
3. How can I increase the size of a granny square bag?
To make a larger granny square bag, such as a beach bag, choose a heavier yarn like worsted or bulky weight and use the appropriate hook size. For a smaller bag, opt for a #2 lace weight yarn and its corresponding hook.
4. How much yarn is needed for a granny square bag?
Typically, one skein of each color is sufficient for the granny square sections of the bag. For the main color, which predominates, about 215 yards from each of the four skeins should be ample.


